Description
Ductile fracture is a type of failure seen in readily deformable (malleable) materials and is characterised by extensive plastic deformation or necking that occurs before the material finally cracks or breaks apart. The term ‘Ductile’ may be considered as one end of a scale, with ‘Brittle Fracture’[1] being at the other end.
Mechanism
To understand the mechanism of ductile fracture it is useful to consider how a piece of material behaves in a tensile test. If a section of round ductile metal bar is gripped at each end and pulled under tensile loading the material will stretch, initially elastically so that if the load is released, the bar returns to its original length and this is the same with brittle materials. However, if the load is slowly increased, there will be a point at which the material then starts to stretch or elongate permanently, and the stretched bar will also start to narrow or thin. A brittle material will not generally plastically deform but will fracture at this point. Following this plastic deformation during loading, the actual fracture initiates slowly with the production of multiple microvoids throughout the metal. These will generally form at minor defects, such as pores, voids, bi-films, inclusions, grain boundaries, or other points of inhomogeneity or stress concentration. The microvoids grow and then coalesce to form a fracture surface.
This may be explained by consideration of the atomic structure of a metal. Metals are made up of crystals, normally called grains, which consist of ordered layers of atoms. When metal is cold-worked such as in the tensile test, slip in atomic planes occur which subsequently cause errors in the atom stacking, known as dislocations. The movement of these dislocations is what allows the metal to deform. However, these dislocations can ‘pile up’ with continued deformation, and make the metal less able to deform, increasing the hardness (termed ‘work hardening’), making the metal less ductile i.e. more brittle. This is why some metals are annealed from time to time as they are cold-worked, allowing atoms to reorganise and dislocations to heal, softening the metal.
Some ductility in a material may be considered desirable. The plastic deformation of materials under load will absorb large amounts of energy. For example, bend a piece of metal a few times and the bent section will be noticeably hotter. This is energy that could have been used in the creation of a crack or fracture, but which has been converted to heat by friction instead.
So, some ductility clearly has benefits for a material in service, but this needs to be within certain parameters so that components can be designed and manufactured to provide reliable performance. For most engineering applications, a minimum level of strength is required i.e. a component needs to resist a certain level of both plastic deformation and fracture, but also needs to exhibit sufficient resistance to elastic deformation under load (stiffness). In engineering terms, this is called the Modulus of Elasticity, or Young’s Modulus.
There are a number of factors that can contribute to a material behaving in a ductile manner, and these are similar in many aspects to brittle fracture, albeit at the other end of the scale and include
- Increased fracture toughness
Fracture toughness relates to the amount of energy that is required to cause a material to fail by fracture, and materials with high fracture toughness will generally behave in a ductile manner, as opposed to a material with a low fracture toughness that will behave in a brittle manner.
- Increased grain size
Large grains in a metal allow for greater movement of dislocations, increasing ductility. Correspondingly, as grains get smaller in a material, the material tends to behave with less ductility. This is because in smaller grains, dislocations have less distance to move before they encounter a grain boundary and are halted.
- Increased temperatures
Increased temperatures generate increases in atom vibration, and movement of dislocations is eased. At sufficiently high temperatures, dislocations may immediately heal during deformation and this is why some metals are worked at high temperature. Interestingly, for lead (Pb), ambient temperatures are effectively already at a level that allows for any work hardening effects to be continuously dissipated i.e. annealed, and it remains malleable and ductile
- Strain rates
The rate at which a material is loaded and subsequently deformed can affect the manner in which it fractures. At very high strain rates, such as that experienced in impact, strain rates may be so high that a normally ductile material may fail in a brittle manner. This is one of the reasons why, for standard tensile tests, the strain rates are specified to ensure consistency and repeatability of results.
- Section size
The section size or thickness of a material subjected to loading to cause fracture will affect how the fracture propagates. When subjected to loading, a material will undergo deformation in three perpendicular axes. For example, in a tensile test on a square-sectioned bar, the material will elongate in the direction that the load is applied, but in the other two directions, the sides of the bar will deform and narrow; the Poisson effect. In a thin material under load, this deformation may extend for the full thickness of the sample and it is said to behave in a ductile manner. With increasing sectional size (thickness) the depth from the surface to which this deformation extends stays relatively constant, and the material in the ‘depth’ of the sample does not deform as it is restrained in all directions by the surrounding material. The resulting fracture will exhibit small lips of deformed material around the edges that formed the original surfaces of the sample (sometimes referred to as shear lips; a ductile fracture), but in the central section of the component, the fracture may exhibit typical brittle fracture characteristics often appearing as a flat fracture surface orientated perpendicular to the direction of loading. However, at high magnification, this ‘brittle’ fracture surface may still exhibit ductile characteristics such as microvoid coalescence
- Microstructure
The selection of specific microstructures in metals is carried out to obtain the desired properties. Brittleness in most applications is not desirable and so some ductility generally is. For a given composition, a metal may be produced with a variety of properties. The most common example being steel where rapid cooling (quenching) of the steel from high temperatures will result in a structure called martensite. This is the hardest condition that the steel can be produced in, but the material will also be particularly brittle. In this condition the steel may be of little practical use. A further heat treatment called tempering is carried out, but at much lower temperatures than the level from which the steel was originally quenched. This allows some transformation of the martensite to take place, reducing the hardness and strength but also reducing the brittleness i.e. increasing ductility. Careful balancing of the tempering temperature allows the desired properties to be achieved such as sufficient hardness and strength but improved ductility.
Appearance
As described above, a key identifier of ductile fracture is the plastic, or permanent deformation that remains in a failed component. This may be gross deformation of the fracture or component, or just deformation at a microscale, only observed at high magnification, such as with microvoid coalescence.
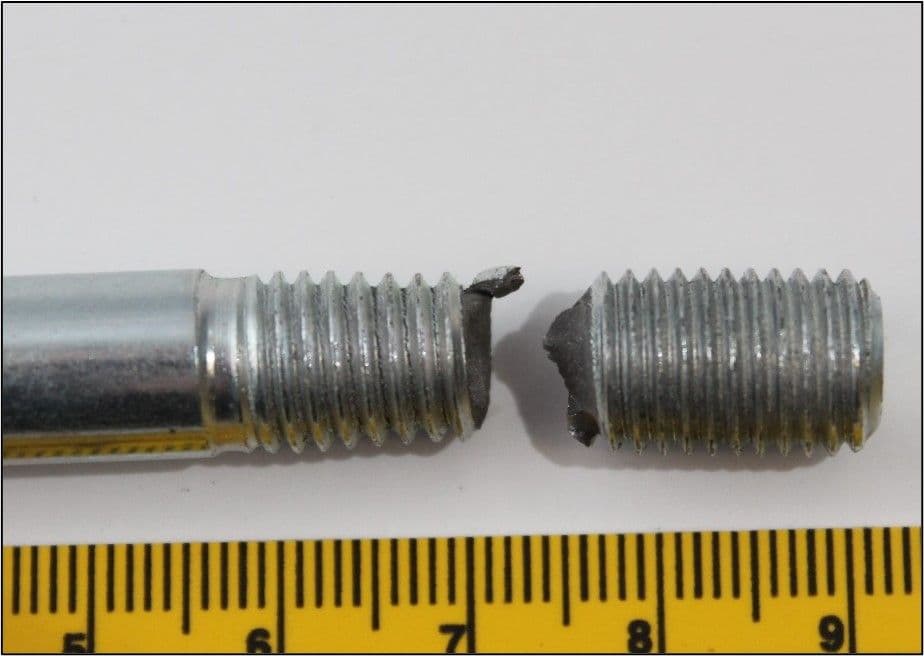
An example of gross plastic deformation is shown in the image below. A bolt had fractured during service and examination clearly shows necking of the cross-section and elongation of the threads to the left of the fracture. A nut was fitted on the end section to the right of the fracture and these threads remained intact. The thread roots on the left also exhibited multiple small cracks as the material was deformed and stressed to beyond its ultimate tensile strength.
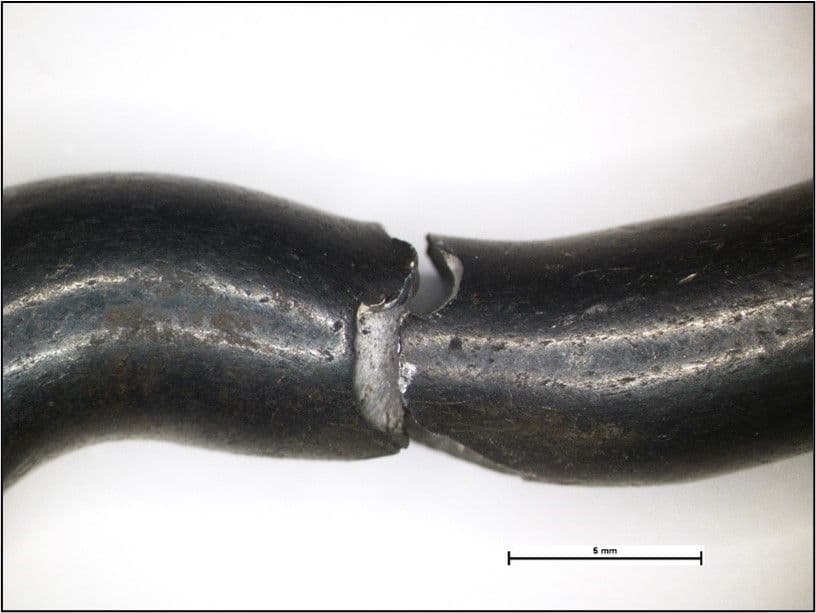
Another example of gross plastic deformation is the section of chain link shown below. These chain links were formed by bending a section of bar into a loop with the ends joined by electric resistance welding. The weld exhibited an area of lack of fusion which subsequently fractured under load. The opposing leg of the link, shown in the image, then took the full load and underwent significant deformation and necking before finally fracturing.
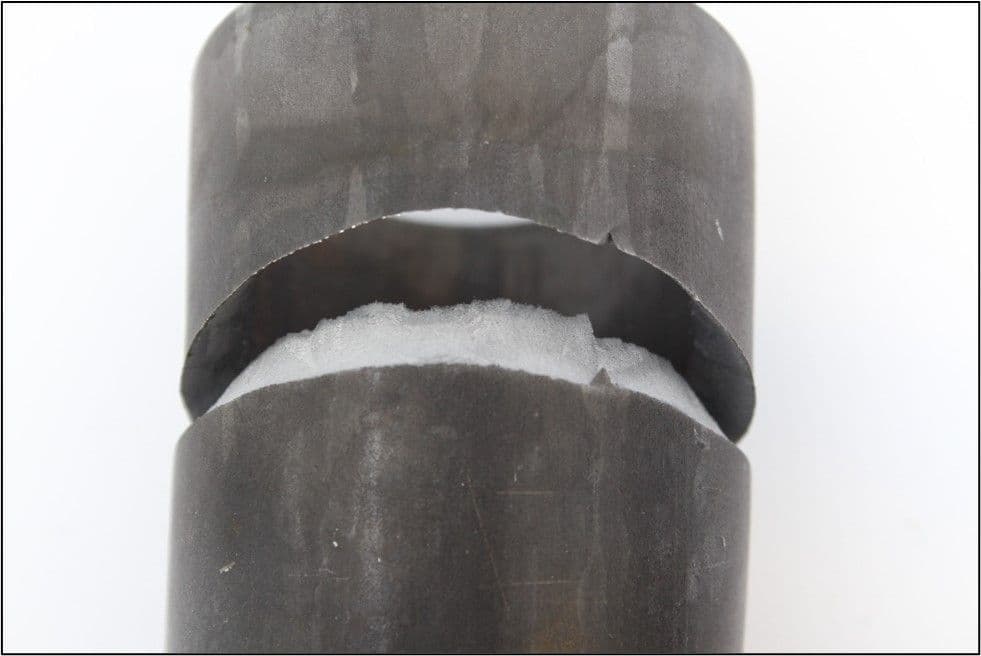
An unusual failure occurred on some thick-walled tubing that was subjected to bending as part of the manufacturing process. Multiple fractures had started to occur on a process that had successfully been carried out many thousands of times before. The bend was only approximately 30° and the bend should be well within the parameters of the material. As shown below, the tube exhibited classic indications of ductile fracture by overload with plastic deformation and some necking.
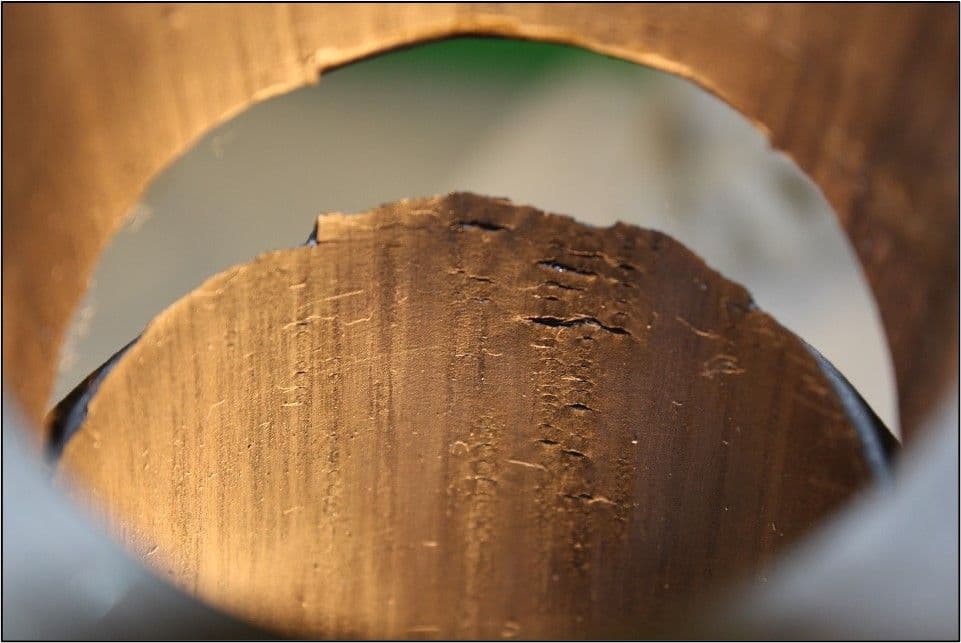
On sectioning, short cracks were then observed on the inner surface of the tube either side of the fracture which was unusual given that none were observed on the outer surface. The tube under bending would be expected to exhibit the greatest stress and strain with crack initiation on the outer surface under ‘normal’ conditions.
To investigate these cracks further, a section was cut through the tube wall and examined using a metallurgical microscope. The image below shows the section through the inner wall with regular shallow cracks in the surface that extend for the full depth of a dark band. This dark band consisted of a fully pearlitic structure, compared to the structure of the remaining thickness of tube which consisted of small grains of pearlite in a ferrite matrix.
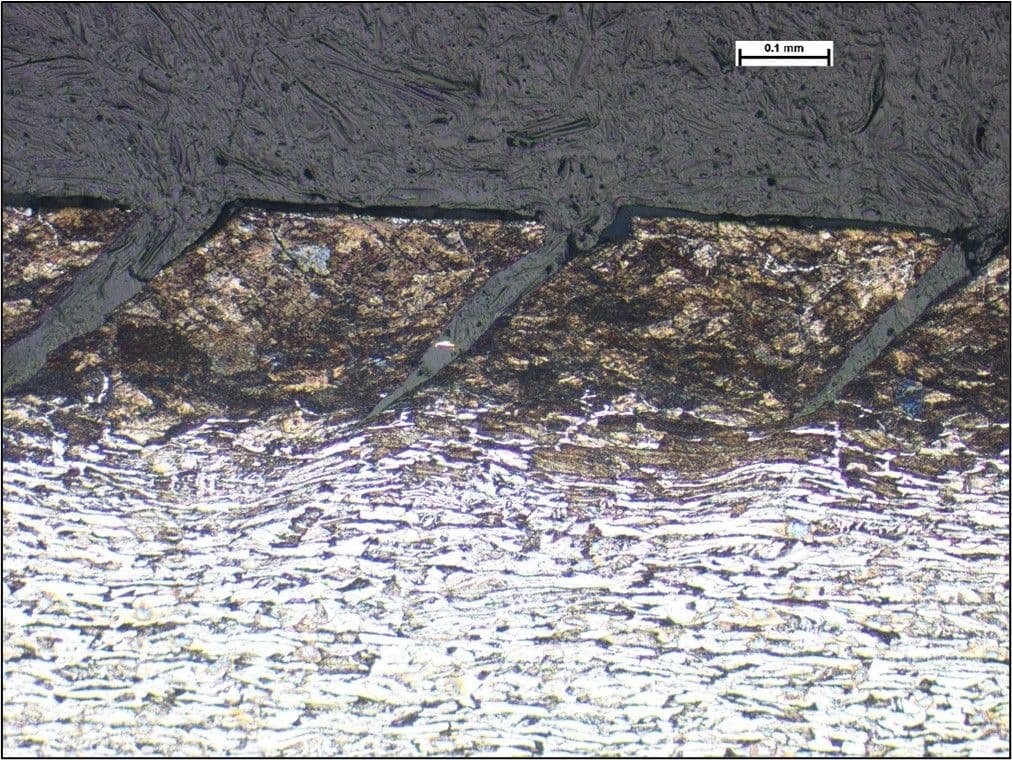
This pearlitic band was not observed on the outer surface of the tube. The fully pearlitic phase was clearly harder and more brittle than the underlying tube structure. This is demonstrated by the brittle nature of the cracks which arrested at the point they met the more ductile core structure. Furthermore, the ductility is highlighted by the wave form of the banded pearlite and ferrite, caused by deformation, absorbing energy and blunting the crack tip. This is also an illustration of the pearlite band exhibiting low fracture toughness compared to the pearlite and ferrite core which exhibits higher fracture toughness.
The cause of this pearlitic band was investigated. A fully pearlitic steel structure would be expected to exhibit a carbon content in the order of 0.8% and compositional analysis by optical emission spectroscopy (OES) confirmed this. The tube composition was specified with a maximum carbon content of 0.3% and this too was confirmed by OES. The supplier of the tube insisted that there was not a problem with their tube, providing material test certificates that showed test results which conformed to the required specification on tensile strength and composition, although tensile tests had been carried out on full section tube samples and other samples machined from the tube. On a full section test, the pearlitic band would have had a negligible effect, and machining of a test sample would have removed the band, so with these standard tests, the presence of the brittle pearlitic band would have been missed.
On further investigation it became apparent that a process had changed in the production of the tube with hydrocarbon-based lubricants used during tube production. These remained on the inside of the tube during heat treatment which allowed carbon from the lubricant to diffuse into the steel surface. Changes to the production process were made by the manufacturer which subsequently resolved this issue.
Avoiding
Unlike brittleness, ductility is generally seen as a more desirable effect although within reasonable limits, so perhaps, the term ‘Avoiding’ is not appropriate. However, engineering of materials to develop known properties, with a balance between hardness, strength, and ductility is required and would include consideration of the following;
- Heat treatment and compositional changes to a material to increase fracture toughness, reduce notch sensitivity, and optimisation of grain size.
- Selection of materials (steels) that exhibit a ductile-brittle transition temperature appropriate for the use. Some steels may exhibit a sudden change in behaviour from ductile to brittle, and therefore could fail catastrophically if used below the critical temperature (the ductile-brittle transition temperature). An often-cited example is the steel used in the construction of the RMS Titanic. The hull plates exhibited transition temperatures of between 32°C and 56°C, and the water temperature at the time was reported to be -2°C i.e. the materials were well below their transition temperature and were in a brittle state. The rivets used in the hull also exhibited brittle behaviour at the low temperature on the night of the accident, when they would ‘normally’ be expected to behave in a more ductile manner. For a given steel composition, certain heat treatments may modify this transition temperature, and which may subsequently be identified by impact tests e.g. Charpy and Izod tests, carried out at a range of temperatures to effectively ‘scan’ for, or bracket this temperature.
- Avoidance of microstructures that are inherently brittle, such as martensite in steels. Tempering the martensite can reduce brittleness, and hence increase ductility, whilst still maintaining sufficient strength for the application.
